Here's Helen...
I hear so many people say they struggle to create manly layouts so let me show you how easy it is, even from a kit that looks really pretty!
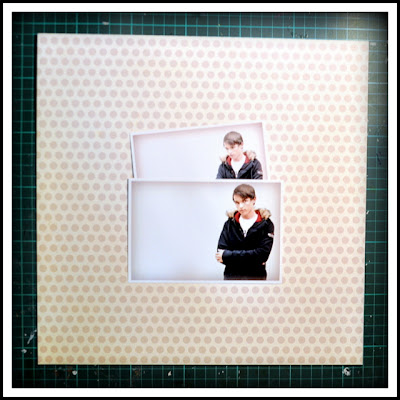
1. Remember to always keep aside a neutral patterned paper like this one so you can create at least one masculine page per kit.
2. Print out some photos to match. Desaturate them so that you can create a more neutral boyish colour palette.
3. Make use of the elements provided in the kit, that are not especially feminine, like the mask for example.
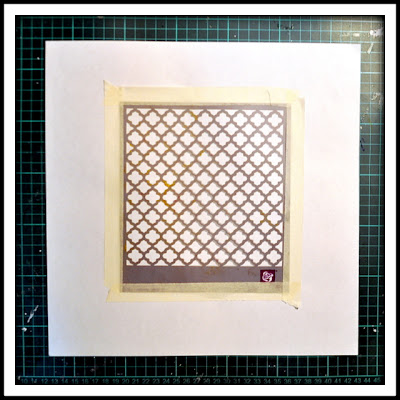
4. To make use of a 6” mask on a 12” layout you need to ensure that you mask off the edges of the stencil using so place your mask on a piece of 12” white paper (I use the album inserts that come with my page protectors). Place your mask in your chosen position.
5. I chose to centre my mask. Use a ruler & set square, together with your gridded out working mat, to ensure that you position it correctly. Secure with masking tape.
6. Now LIGHTLY score around the edges of your mask with your cutting knife but do NOT cut deeply or you will damage your mask. Now pull & carefully tear away the paper to reveal your mask again.
7. This is the area where your mists will not penetrate & the rest of your page will be protected. Voila! Using a lightbox makes this step easier or just put your page up against a window like I did!
8. Now place your the new 12” mask you have just made OVER your printed paper & mist. I used the Maya Road Charcoal mist provided in one of my My Creative Scrapbook Kits last year.
9. And there you have it! Your masked area is complete! Now all that you have left is to add your photograph & embellish away!!
10. Using your dymo for journaling always adds a heavier, more masculine touch. I still used the glitter thickers though & I think they look great! All the beige papers you see are cut from the PRIMA PACKAGING (from the flowers) so don’t forget to save that! Staples & string are inexpensive masculine elements you can also add.
I hope you enjoyed my tutorial!
For many more examples of masculine layouts please visit my blog at http://helentilbury.blogspot.com
Helen Tilbury
My Creative Scrapbook Design Team member
----------------------------------------
Check out more of Helen's beautiful layouts featuring our March Main kit:
(click photos to enlarge)
Here's the March Main kit:

Helen also designed several lovely creations with our March Limited Edition kit:
(click photos to enlarge)
Here's the March Limited Edition kit:
Thank you, Helen!
My Creative Scrapbook kit club is all about you and helping you preserve your memories in a fun and creative way. For information about subscribing to any of our monthly kits, please visit our website, here.
Check out more of Helen's beautiful layouts featuring our March Main kit:
(click photos to enlarge)
Here's the March Main kit:

Helen also designed several lovely creations with our March Limited Edition kit:
(click photos to enlarge)
Here's the March Limited Edition kit:
Thank you, Helen!
My Creative Scrapbook kit club is all about you and helping you preserve your memories in a fun and creative way. For information about subscribing to any of our monthly kits, please visit our website, here.


2 comments:
Fabulous tut....you make it look so easy, Helen - LOVE your work...TFS:):):)
This is an awesome tip. I am going to make one out of a lightweight chipboard to use with all my masks. Thanks for the idea.
Post a Comment