
To view or purchase our kits, click here.
------------------------------
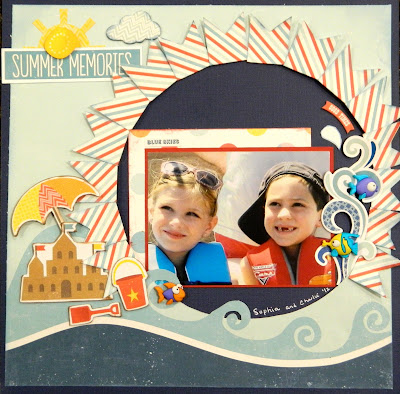
My Creative Scrapbook Design Team member Joan Bronson is sharing several fun techniques today featuring our June Creative kit!
Here's Joan:
"Making a Water Bubbles
I immediately reached for my water play pictures when I received my Creative kit. I was also drawn to my Glossy Accents since I thought it would be fun to add some water bubbles to the layout. I used my circle mask to add bubbles randomly on my page. Once dry, I outlined the bubbles with a white gel pen. I think it helped the bubbles pop off the page. "


------------------------------
Recently, I saw a sketch using triangles. I was a bit intimidated but I decided to give it a go. I hope you consider trying it too.
I started by making a chipboard template of a triangle measuring 3 ½ x 7. I used my template to cut 3 triangles out of the patterned paper and a 4th triangle using my photo. I also cut one more slightly larger triangle out of patterned paper. I used this for my photo mat.

I originally planned on using a 5x7 photo but be warned – don’t zoom in too much or use a close up snapshot because you’ll lose your picture when you crop it. I ended up using a 4x6 photo. It is missing all the points but with a few embellishments strategically placed I made it work.

------------------------------
Flag technique:
Creating the cut out circle: I used a cereal bowl, pencil, and craft knife to cut my circle out of the patterned paper (approximately 7 ¾ in diameter). I decided to leave the waves in at the bottom of the paper so I cut around them and erased the remaining pencil lines.

Creating the flags: First, I suggest cutting all the papers for the flags at the same time. Personally, I wanted my all my stripes going in the same direction and cutting them all at the same time helped me insure I did that. Each flag measures 1 ¼ wide by 1 ¾ long. I cut 16 flags. Once each flag was cut, I lightly folded each piece together length wise and cut at an upward angle starting at the bottom edge where the two corners fold together (open side not folded side).


Lastly, I scored each flag ¼ inch from the top to create my tuck in flap and inked each piece with a light blue ink (but I wish I used navy blue).
Note: The flags on the right side of the circle were trimmed shorter so they didn’t hang off the page. Assembly: I flipped my patterned paper over and added adhesive along the circle staying as close to the circle cutout as possible. I also added adhesive to the bottom inside edge of each flag. I didn’t add adhesive to the ends of the flags so they would stick up some. Once the flags were added to the layout I attached the patterned paper to the cardstock.
I hope you’ll give this technique a try.


Joan Bronson
My Creative Scrapbook Design Team member
------------------------------
Here's the June Creative kit:

and here's more of Joan's beautiful work using this kit:


My
Creative Scrapbook kit club is all about you and helping you preserve
your memories in a fun and creative way. For information about
subscribing to any of our monthly kits, please visit our website, here.
No comments:
Post a Comment