
Brenda Cazes is featuring our November Main Kit today with instructions for printing on journaling cards!
--------------------
Hello everyone! Today I’m going to show you how to use your printer to print on journaling cards like I did on this layout.

I really don’t like my handwriting and prefer to print my journaling. However, a lot of my layouts have my handwriting as I feel it adds a personal touch, but sometimes I want the clean look of printed journaling. Or if I have a lot of journaling and not a lot of space for it, I prefer to print it.
The first step is to measure the journaling card – keeping in mind the margins. For example, if your journaling card is 3” wide, you’ll want your printing to be about 2 ¾“ wide. Next, you’ll want to open your word processing software. I use Microsoft Word.
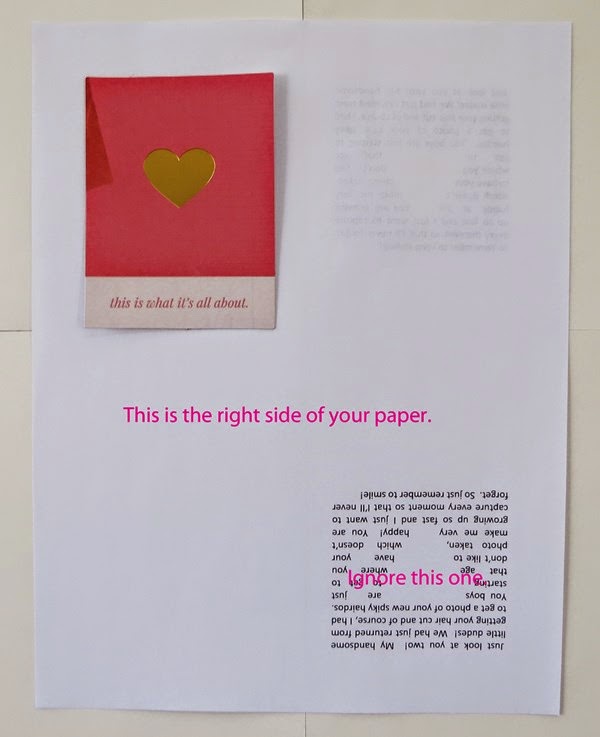
I usually just guesstimate the spacing the first time and then print it out. Be sure to pay attention to how your printer prints, so that you know how to feed the paper into it once you’re ready to print onto your journaling card. Put the journaling card behind your printed paper and hold up to the light to see if your spacing is correct. If not, make your adjustments and print again. This step can take a few tries before you get it right. As you can see in my photo below, it took me three tries.

In order to print around the heart on this card, I inserted a triangle. I used a triangle because there is no heart shape and it was close enough. In Microsoft Word go to Insert on the Main Tool Bar, click on Shapes and then on the triangle. I measured the heart on the card and made the triangle the same size using the rulers at the top and side of the screen. Next, I turned the triangle upside down so that it was similar to the heart shape. To do this, put the cursor at the top of the triangle until the cursor turns to a rounded arrow. Click and hold and drag the triangle until it is upside down. Then, with the Drawing Tools toolbar open, click on Wrap Text button and choose “Tight”. This will allow your text to wrap tightly around your shape.
Once the spacing is correct, draw a line around your journaling card so that you know where it needs to go. This box will be on the back of your printed paper. (For photography purposes, I flipped my journaling card over so you can see it, otherwise it would have been white on white and very hard to see.)


Now flip the paper over and using a tape runner put a couple of lines of adhesive inside the box you drew.
Stick your journaling card to the adhesive lining up the edges of the card to the box you drew earlier by holding it up to the light so you can see the lines.
Run it through your printer again and remove the printer paper from your journaling card.


--------------------
You can see more of Brenda's beautiful work in our Design Team Gallery!
Here's the November Main Kit:

We invite you to join us and experience the possibilities that our coordinated monthly kits offer. To purchase a kit, please visit our website, here.
--------------------
Hello everyone! Today I’m going to show you how to use your printer to print on journaling cards like I did on this layout.
I really don’t like my handwriting and prefer to print my journaling. However, a lot of my layouts have my handwriting as I feel it adds a personal touch, but sometimes I want the clean look of printed journaling. Or if I have a lot of journaling and not a lot of space for it, I prefer to print it.
The first step is to measure the journaling card – keeping in mind the margins. For example, if your journaling card is 3” wide, you’ll want your printing to be about 2 ¾“ wide. Next, you’ll want to open your word processing software. I use Microsoft Word.
I usually just guesstimate the spacing the first time and then print it out. Be sure to pay attention to how your printer prints, so that you know how to feed the paper into it once you’re ready to print onto your journaling card. Put the journaling card behind your printed paper and hold up to the light to see if your spacing is correct. If not, make your adjustments and print again. This step can take a few tries before you get it right. As you can see in my photo below, it took me three tries.
In order to print around the heart on this card, I inserted a triangle. I used a triangle because there is no heart shape and it was close enough. In Microsoft Word go to Insert on the Main Tool Bar, click on Shapes and then on the triangle. I measured the heart on the card and made the triangle the same size using the rulers at the top and side of the screen. Next, I turned the triangle upside down so that it was similar to the heart shape. To do this, put the cursor at the top of the triangle until the cursor turns to a rounded arrow. Click and hold and drag the triangle until it is upside down. Then, with the Drawing Tools toolbar open, click on Wrap Text button and choose “Tight”. This will allow your text to wrap tightly around your shape.
Once the spacing is correct, draw a line around your journaling card so that you know where it needs to go. This box will be on the back of your printed paper. (For photography purposes, I flipped my journaling card over so you can see it, otherwise it would have been white on white and very hard to see.)
Now flip the paper over and using a tape runner put a couple of lines of adhesive inside the box you drew.
Stick your journaling card to the adhesive lining up the edges of the card to the box you drew earlier by holding it up to the light so you can see the lines.
Run it through your printer again and remove the printer paper from your journaling card.
--------------------
You can see more of Brenda's beautiful work in our Design Team Gallery!
Here's the November Main Kit:
We invite you to join us and experience the possibilities that our coordinated monthly kits offer. To purchase a kit, please visit our website, here.
No comments:
Post a Comment