
My Creative Scrapbook design team member Lisa Swift is up today with a tutorial featuring our November Creative Kit!
Here's Lisa:


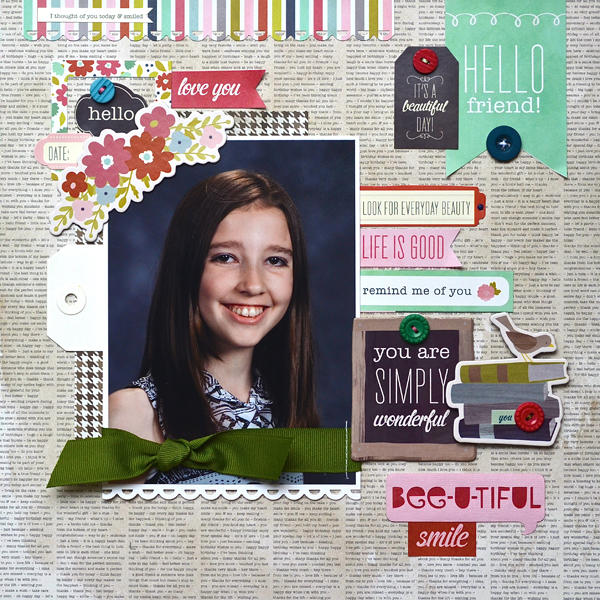
1a. The Front Porch Knock Knock paper is full of wonderful elements to use as embellishments on your pages. Do you see the block highlighted by the large arrow, toward the bottom left side of the paper? Cut this piece from the sheet. Cut the sentiment from the center of it (following the dotted border I've noted as a guide) and use the floral piece as a frame. The "love you" banner (shown on the photo above) was also cut from this paper (middle row, toward top).

2. Now it's time to start the layering process.

Add two phrase stickers ("hello" and "date"), the photo, then the large floral chipboard piece to the page. Note: The photo mat should be cut slightly longer than the photo itself to leave room for a punched border at the bottom.
Tie a length of green grosgrain ribbon around the photo before adhering it to the page. I like to secure ribbon to the back of a photo with a bit of double sided tape so it doesn't slip and slide while I'm trying to tie it. When I'm done, I use my sewing machine to run a vertical stitch down one side of the ribbon to be sure it stays in place.
2a. Adhere the "Hello friend!" banner (cut from the Knock Knock paper) along the upper right edge of the page. Layer the "It's a beautiful day!" sticker tag over the banner. Add buttons as shown, securing them to the page with embroidery floss.
2c. I've tucked a basic white shipping tag (from my stash) behind my photo because this is how I like to do my journaling. I'll get to that once the layout is finished.
3. Add a mix of Knock Knock paper sentiments, phrase stickers and chipboard pieces to the right of the photo.

4. Now it's time for the finishing touches, like the title (which is spread around the page, in a visual triangle), some chipboard flowers (to balance the large chipboard piece anchoring the top left corner of the photo), and a finished journaling tag tucked in behind the photo.

Thanks so much for coming along on this creative journey with me today. I hope you enjoyed seeing how this page came together and learned a bit about my creative process.

We invite you to join us and experience the possibilities that our coordinated monthly kits offer. To purchase a kit, please visit our website, here.
Lisa here today to show you, step-by-step, how this page came together. Let's peel away the layers and take a look, shall we?

You may have noticed a number of pencil markings around the page. That's because I plan my pages out. Once I get everything where I like it, I pencil in where everything goes. After that, I take everything off the background, then start putting pieces back in a methodical manner. It's kind of like doing a puzzle.
1. Lay the groundwork for the left side of the page — a punched border, a block of patterned paper as the backdrop for the photo, a small floral frame (to see where this piece came from, see the photo below) and a banner.

1a. The Front Porch Knock Knock paper is full of wonderful elements to use as embellishments on your pages. Do you see the block highlighted by the large arrow, toward the bottom left side of the paper? Cut this piece from the sheet. Cut the sentiment from the center of it (following the dotted border I've noted as a guide) and use the floral piece as a frame. The "love you" banner (shown on the photo above) was also cut from this paper (middle row, toward top).
2. Now it's time to start the layering process.

Add two phrase stickers ("hello" and "date"), the photo, then the large floral chipboard piece to the page. Note: The photo mat should be cut slightly longer than the photo itself to leave room for a punched border at the bottom.
Tie a length of green grosgrain ribbon around the photo before adhering it to the page. I like to secure ribbon to the back of a photo with a bit of double sided tape so it doesn't slip and slide while I'm trying to tie it. When I'm done, I use my sewing machine to run a vertical stitch down one side of the ribbon to be sure it stays in place.
2a. Adhere the "Hello friend!" banner (cut from the Knock Knock paper) along the upper right edge of the page. Layer the "It's a beautiful day!" sticker tag over the banner. Add buttons as shown, securing them to the page with embroidery floss.
2c. I've tucked a basic white shipping tag (from my stash) behind my photo because this is how I like to do my journaling. I'll get to that once the layout is finished.
4. Now it's time for the finishing touches, like the title (which is spread around the page, in a visual triangle), some chipboard flowers (to balance the large chipboard piece anchoring the top left corner of the photo), and a finished journaling tag tucked in behind the photo.

Thanks so much for coming along on this creative journey with me today. I hope you enjoyed seeing how this page came together and learned a bit about my creative process.
--------------------------------------------------------------
Be sure to take a look at Lisa's beautiful work in our Design Team Gallery!
We invite you to join us and experience the possibilities that our coordinated monthly kits offer. To purchase a kit, please visit our website, here.
No comments:
Post a Comment