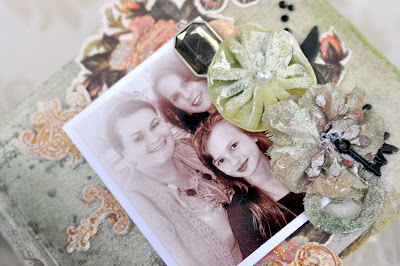
Here's Helen:
"Working on this gorgeous little beauty should take you about 12 hours - I
suggest making it over the course of a week (during the evenings if you work
during the day) as there's drying time between processes.
BEFORE YOU BEGIN assembling the album you need to do the 'ground work'
preparing the raw chipboard pieces, the linen cover & pages & the inside
chipboard cover & chipboard pages.
You do NOT need to use the same colours or mediums as I have used so feel
free to improvise & use what you have on hand!
FOR MY ALBUM SPINE - I reserved one flower & hot glued the lace & measuring
tape ribbon on first before knotting & inking up the remaining measuring
tape ribbon to make the bows.
Don't worry that your book won't close - that's the whole idea - it's a 3D
shabby delight & meant to stand upright on a counter just waiting for
passers by to take a peek. It also looks awesome up on a shelf away from
little hands :)
FOR THE INSIDE COVER - I used Golden Glass Bead Gel then rubbed over with a
sponge dipped in the 'Driftwood' & PINK mist for a mottled effect & finally
sealed by spraying with glitter varnish.
FOR THE PAGES - I misted using the 'Driftwood' mist from the kit & also used
a PINK mist for some contrast - spraying randomly on each page - once dry I
used the Maya Road 6" grid mask (from a previous My Creative Scrapbook Kit)
together with some gesso & quickly added some texture/pattern to only some
areas of each page. I finished off my page preparation by spraying each
page with 'Glitter Varnish' (in a spray can) to seal.
FOR THE FLOWERS - I dabbed them with gesso on a sponge then sealed with
glitter varnish.

FOR THE ARTISAN ELEMENTS from Pink Paislee (the cream rubber embellishments)
I painted these with gold glitter varnish (I use nail varnish & it works
perfectly) then cut these elements up smaller so I could tuck them under my
flower clusters.
FOR THE CHIPBOARD PIECES - I painted them with white acrylic paint, followed
by Golden Glass Bead Gel followed by misting then glitter varnish (drying
between layers). I cut these all into smaller pieces to fit my tiny album
too.
Once you have prepared all your pieces & selected & printed out your photos
the fun begins!
A tip to make sure you have a balanced album = lay out all the photos on your desk and pair with a selection of embellishments until all your embellishments are utilised - that way they will be evenly distributed! (I cut up the black rhinestone swirl into smaller parts too!)
Now cluster & layer to your hearts delight!
Want your mini-album to last 'forever'? Turn on your hot-glue gun & use it for EVERYTHING - it's the strongest hold & it's what's required for something that gets handled often & is not behind a page protector in an album.
Have fun & create your own mini masterpiece!!"
Helen Tilbury
My Creative Scrapbook Design Team member
------------------------------
Here's the April Off the Page Project kit that Helen used:
Our Off the Page Project kits can be found in the Add-Ons section of our website. Although they can be purchased without a subscription, they're available only in limited quantities and therefore sell out quickly. The purchase of a subscription will guarantee that a kit will be available for you each month.
Helen also designed several layouts using our April Limited Edition kit:
Here's one of her layout using this kit, but please head over to our Design Team gallery to view the rest!
My
Creative Scrapbook kit club is all about you and helping you preserve
your memories in a fun and creative way. For information about
subscribing to any of our monthly kits, please visit our website, here.


3 comments:
WOW Helen! Beyond gorgeous!!! You have an amazing talent! Thanks so much for the inspiration!
Oh wow Helen, this album is gorgeous, I love the detail on each page.
Thank you so much ladies! It was an absolute pleasure to create using such a wonderful kit!!
Post a Comment