
Design Team member Jackie Clark amazed us with her fabulous hanging advent calendar that she created with our December Limited Edition kit! We're sure you'll be as thrilled as we are that she prepared a detailed step by step photo tutorial so that you can make this advent calendar, too!
Here's Jackie...
Here's Jackie...
Today I'm sharing a tutorial for making a hanging advent calendar using the Prima Sweet Peppermint collection included in the December Limited Edition kit. I don't know about you, but in our house the Christmas season starts as soon as December 1st rolls around and the advent calendars come out. In addition to helping mitigate questions of "how much longer until Christmas?" the little goodies contained in the advent calendar help to get my boys out of bed on time in the morning during some of the darkest days of the year. And despite the fact that they are starting the day with a candy, I'll take it for not having to bodily drag them out of their beds kicking and screaming.

I generally like to open a kit without having any idea of where the contents will take me stylistically. When I came upon this sheet in the Sweet Peppermint 12x12 paper pack, I knew immediately that I wanted to create an advent calendar; I'm sure you can see why.


The bag on the left is the uncoated original, while the bag on the right has been treated with a coat of clear gesso brushed on with a paintbrush to ensure even coverage. Take care of the open edge at the top of the bag, as if you get gesso inside it it will seal closed. It will be rolled over in the final stages, so you do not need to ensure your media goes all the way to the top.
For the next step, I randomly applied super heavy white gesso. This does not need to be pretty or follow any kind of rhyme or reason. A lot of it will be covered by later steps, and the idea is to build layers of texture, not a predetermined composition.

Allow each layer to dry before proceeding to the next step. I prepared all 25 of the baggies at the same time.
Next, add a layer of stenciling using light modeling paste (you could also use regular modeling/molding paste, it will just be heavier). The modeling paste will absorb color differently than the gesso, giving you additional texture. I used a snowflake stencil (being extremely Type A), but again, you will be covering up a lot of the background, so the pattern isn't important.

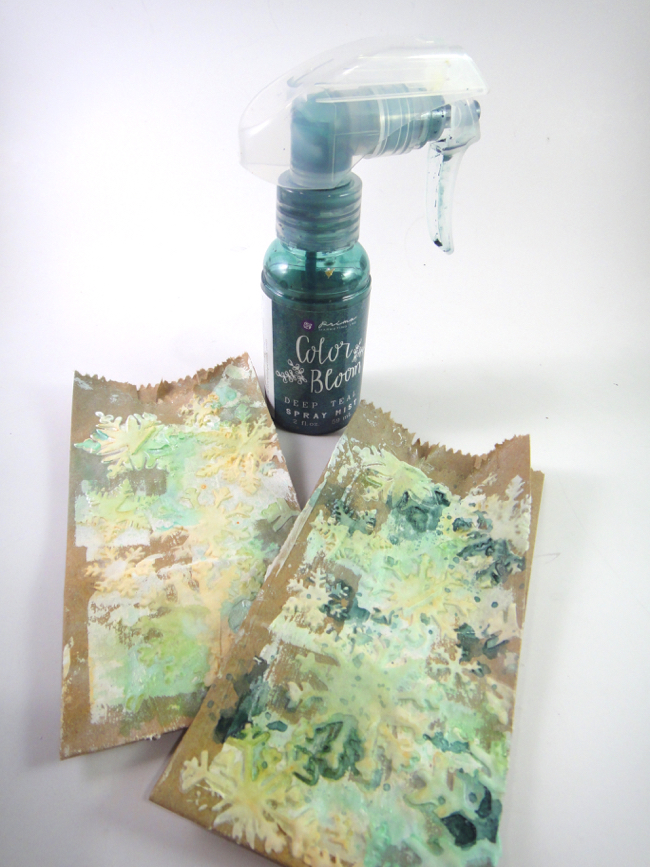
With my background textures in place, I started laying down colour from lightest to darkest. I used my lighter colours heavily, and each progressively darker colour more and more sparingly. I started with some gold and beige sprays.

To prevent muddying of the colours, I used my heat gun to dry each layer of colour before proceeding. You can use any brand of sprays you have on hand; I mixed and matched from my collection to get the right colours and for the different effects achievable with the different sprayers.
Next, I laid down some light blue and blue-green.

You can see that I left some of the base layer of gold showing; with subsequent layers of colour I endeavoured to do the same by spraying only on top of the colour I had sprayed in the previous layer.

I finished off with a pop of an accent colour.

For some additional texture and a pop of shimmer, I water down some embossing ink (about 1:1 with water), and splattered it across the background using a paintbrush, then heat embossed it with gold embossing powder.

Here is a closeup of the finished background. It looks like a bit of an abstract mess, but when you look closer you can see all the different layers.

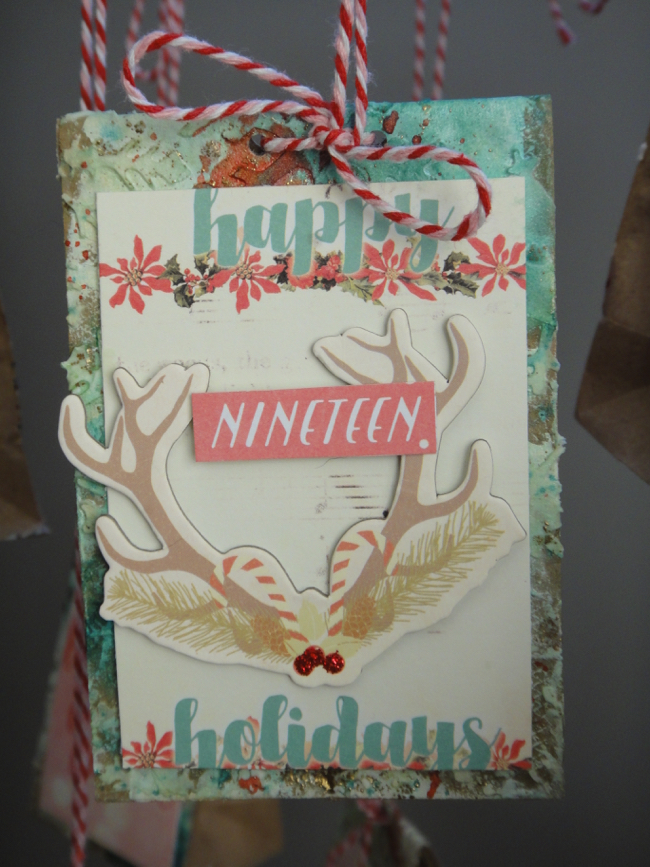
The baggy is then ready to embellish. For my embellishments I primarily used the chipboard elements from the kit along with the numbered strips from the background paper and elements from other papers in the paper pack, adding some trim and glitter glue here and there.

To hang the baggies, I folded the top of each over twice (after filling them with a little treat), and punched two small holes side-by-side with my Cropadile. I threaded through baker's twine in varying lengths from the back, and tying a bow in the front.

I admired white-painted, glitter encrusted branches in stores, but was unwilling to pay the exorbitant prices they commanded. Armed with a canister of spray gesso and some glitter, I figured I could replicate the effect at home.
I cut three 3.5 - 4 foot branches from a maple tree in my backyard to make the frame to hang the baggies from. Working with green wood has a couple of advantages. Because it is still moist, it is flexible, which means that it bends rather than breaks. It also has the advantage over windfallen branches of not being rotten and waterlogged.
I tied the branches together to make a haphazard lattice (I used a plastic mock-raffia, but a natural material trim will take the paint better).
Now, a note about spray gesso (and about other spray media by extension): it needs to be applied it a well-ventilated area. Take my word for it. Even applied in the great outdoors, the fumes pack a punch! I apply mine on our covered porch - it has the circulation needed but is protected from the elements (a necessity in rainy Vancouver). After spraying my projects with anything, I leave them outside for at least 15 minutes, but often overnight, to allow the fumes to dissipate.
Because the spray gesso is a paint, be sure to use some kind of a drop-cloth to prevent inadvertently painting the surface you have your project resting on. I used impermeable plastic.

The above branches are smaller than those used on my original project, as in between completing the project and photographing the tutorial we got a dump of snow, but you get the idea.
Don't worry about complete coverage; having traces of the natural wood peek through adds to the effect of a snowy branch. Be sure to flip your project over and spray the underside as well.

As mentioned, I then leave it outside to dry and for the smell to dissipate.
To add to the snowy effect, I then dabbed gel medium on randomly, and sprinkled on Distress Glitter (any glitter would work, but I like the chunky texture of the Distress Glitter).

Once that was dry, I tied each of the baggies to the branches, hanging at different heights.

Here are a couple of closeups of some of my favourite baggies.


I hope you've enjoyed this tutorial and that you are motivated to go out and make your own advent calendar (it may be a bit of a late start this year, but it also makes a lovely Christmas decoration).
XOXO
Jackie

I generally like to open a kit without having any idea of where the contents will take me stylistically. When I came upon this sheet in the Sweet Peppermint 12x12 paper pack, I knew immediately that I wanted to create an advent calendar; I'm sure you can see why.

I had seen an image of a hanging advent calendar on Pinterest, and decided that I wanted to alter little brown paper bags to suit my needs. I bought a pack of 100 - 3 x 5.5" bags at a local packaging store for about $5. As you can imagine, paper bags don't always hold up to heavy applications of wet media, so I started by laying down a waterproof base coat of clear gesso.

For the next step, I randomly applied super heavy white gesso. This does not need to be pretty or follow any kind of rhyme or reason. A lot of it will be covered by later steps, and the idea is to build layers of texture, not a predetermined composition.

Allow each layer to dry before proceeding to the next step. I prepared all 25 of the baggies at the same time.
Next, add a layer of stenciling using light modeling paste (you could also use regular modeling/molding paste, it will just be heavier). The modeling paste will absorb color differently than the gesso, giving you additional texture. I used a snowflake stencil (being extremely Type A), but again, you will be covering up a lot of the background, so the pattern isn't important.

With my background textures in place, I started laying down colour from lightest to darkest. I used my lighter colours heavily, and each progressively darker colour more and more sparingly. I started with some gold and beige sprays.

To prevent muddying of the colours, I used my heat gun to dry each layer of colour before proceeding. You can use any brand of sprays you have on hand; I mixed and matched from my collection to get the right colours and for the different effects achievable with the different sprayers.
Next, I laid down some light blue and blue-green.

You can see that I left some of the base layer of gold showing; with subsequent layers of colour I endeavoured to do the same by spraying only on top of the colour I had sprayed in the previous layer.
I finished off with a pop of an accent colour.

For some additional texture and a pop of shimmer, I water down some embossing ink (about 1:1 with water), and splattered it across the background using a paintbrush, then heat embossed it with gold embossing powder.

Here is a closeup of the finished background. It looks like a bit of an abstract mess, but when you look closer you can see all the different layers.

The baggy is then ready to embellish. For my embellishments I primarily used the chipboard elements from the kit along with the numbered strips from the background paper and elements from other papers in the paper pack, adding some trim and glitter glue here and there.

To hang the baggies, I folded the top of each over twice (after filling them with a little treat), and punched two small holes side-by-side with my Cropadile. I threaded through baker's twine in varying lengths from the back, and tying a bow in the front.

I admired white-painted, glitter encrusted branches in stores, but was unwilling to pay the exorbitant prices they commanded. Armed with a canister of spray gesso and some glitter, I figured I could replicate the effect at home.
I cut three 3.5 - 4 foot branches from a maple tree in my backyard to make the frame to hang the baggies from. Working with green wood has a couple of advantages. Because it is still moist, it is flexible, which means that it bends rather than breaks. It also has the advantage over windfallen branches of not being rotten and waterlogged.
I tied the branches together to make a haphazard lattice (I used a plastic mock-raffia, but a natural material trim will take the paint better).
Now, a note about spray gesso (and about other spray media by extension): it needs to be applied it a well-ventilated area. Take my word for it. Even applied in the great outdoors, the fumes pack a punch! I apply mine on our covered porch - it has the circulation needed but is protected from the elements (a necessity in rainy Vancouver). After spraying my projects with anything, I leave them outside for at least 15 minutes, but often overnight, to allow the fumes to dissipate.
Because the spray gesso is a paint, be sure to use some kind of a drop-cloth to prevent inadvertently painting the surface you have your project resting on. I used impermeable plastic.

The above branches are smaller than those used on my original project, as in between completing the project and photographing the tutorial we got a dump of snow, but you get the idea.
Don't worry about complete coverage; having traces of the natural wood peek through adds to the effect of a snowy branch. Be sure to flip your project over and spray the underside as well.

As mentioned, I then leave it outside to dry and for the smell to dissipate.
To add to the snowy effect, I then dabbed gel medium on randomly, and sprinkled on Distress Glitter (any glitter would work, but I like the chunky texture of the Distress Glitter).

Once that was dry, I tied each of the baggies to the branches, hanging at different heights.

Here are a couple of closeups of some of my favourite baggies.


I hope you've enjoyed this tutorial and that you are motivated to go out and make your own advent calendar (it may be a bit of a late start this year, but it also makes a lovely Christmas decoration).
XOXO
Jackie
------------------------------------
Here is the December Limited Edition Kit:

To see more beautiful creations made with the contents of this kit, please visit our inspiring Design Team Gallery
For more information about our kits, visit our website at MyCreativeScrapbook.com

No comments:
Post a Comment