
My Creative Scrapbook Guest Designer Jaclyn Rench is featuring our January Main Kit today with a beautiful home décor piece! Just wait until you see her super creative use of the buttons in the kit!
--------------------
Buttons have always been a favorite embellishment of mine. In fact, there was a time period where I simply couldn't call a page complete, without adding a button somewhere on it's 12x12 canvas. You can imagine my delight then, when I opened the contents of the January Main Kit and found an entire package of buttons, perfectly coordinated to match the pretty Fancy Pants Happy Place collection papers in the kit.
Because of my love for this tiny embellishment, I'm not one to typically just plop a button on a page. Rather, I love using them in unique and decorative ways. Today, I thought I'd share with you a fun and impactful way to add a shaped button embellishment to your next project.
I made this altered home décor piece with the January Main Kit. I used several of the Fancy Pants Happy Place collection 3x4 Brag Cards to layer among and under my photos and diecut pieces.


To mimic this look, you'll need to start with a shaped paper punch and a 3x4 card of your choosing. Keep in mind that the heart shaped punch I used in this example measures around 1.5" wide. In addition, you'll want to take note of the pattern on your 3x4 card, to ensure that it's design would not be obstructed by a punched shape.
Start by punching your design from the 3x4 card. I chose to punch my heart in the lower right corner of my patterned paper piece, as I knew I would need to leave room on the left side for layering additional diecuts and embellishments that I had selected.

The next step is to trim a scrap piece of 3x4" white cardstock, to act as your base. Layer your 3x4 punched card over top of the scrap white cardstock, evenly aligning all four sides. At this point, you can use a pencil to lightly trace within the negative space of the design onto the underlying piece of cardstock.

Now it's time to pull out the buttons! I chose to stick to all red buttons for my heart, but gave it an eclectic look by using a mix of sizes. Lay out your chosen buttons onto the base layer of cardstock, making sure to cover all areas of the traced shape, as shown below.


Here's a look at what your cardstock piece should look like once all of the buttons are in place. It doesn't look much like a heart, does it?! But that's okay, because we are going to take care of that part next.


--------------------
Please visit our Design Team Gallery to view more of Jaclyn’s beautiful work.
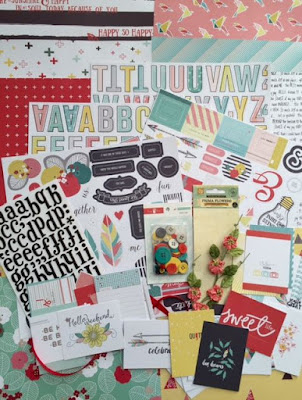
Here's the January Main Kit:
For full descriptions of our kits, subscription information, and more, visit our website at MyCreativeScrapbook.com
--------------------
Buttons have always been a favorite embellishment of mine. In fact, there was a time period where I simply couldn't call a page complete, without adding a button somewhere on it's 12x12 canvas. You can imagine my delight then, when I opened the contents of the January Main Kit and found an entire package of buttons, perfectly coordinated to match the pretty Fancy Pants Happy Place collection papers in the kit.
Because of my love for this tiny embellishment, I'm not one to typically just plop a button on a page. Rather, I love using them in unique and decorative ways. Today, I thought I'd share with you a fun and impactful way to add a shaped button embellishment to your next project.
I made this altered home décor piece with the January Main Kit. I used several of the Fancy Pants Happy Place collection 3x4 Brag Cards to layer among and under my photos and diecut pieces.

The small 3x4 card sized canvas proved to be the perfect spot to highlight my shaped button style embellishment.

To mimic this look, you'll need to start with a shaped paper punch and a 3x4 card of your choosing. Keep in mind that the heart shaped punch I used in this example measures around 1.5" wide. In addition, you'll want to take note of the pattern on your 3x4 card, to ensure that it's design would not be obstructed by a punched shape.
Start by punching your design from the 3x4 card. I chose to punch my heart in the lower right corner of my patterned paper piece, as I knew I would need to leave room on the left side for layering additional diecuts and embellishments that I had selected.

The next step is to trim a scrap piece of 3x4" white cardstock, to act as your base. Layer your 3x4 punched card over top of the scrap white cardstock, evenly aligning all four sides. At this point, you can use a pencil to lightly trace within the negative space of the design onto the underlying piece of cardstock.

Now it's time to pull out the buttons! I chose to stick to all red buttons for my heart, but gave it an eclectic look by using a mix of sizes. Lay out your chosen buttons onto the base layer of cardstock, making sure to cover all areas of the traced shape, as shown below.

Once arranged, your buttons can now be adhered in place. I like to stitch my buttons on, but you can save on time by adhering them with a strong, quick drying adhesive, like a glue dot.

Here's a look at what your cardstock piece should look like once all of the buttons are in place. It doesn't look much like a heart, does it?! But that's okay, because we are going to take care of that part next.

Now you'll want to adhere your original 3x4" design over top of your mosaic of buttons. Since the buttons are dimensional, using a flat adhesive will not work effectively. Using foam adhesive allows for the patterned piece to lay flush with the button design. When attaching your foam adhesive, be sure to leave space surrounding the punched out design, as shown below.

When you attach the two layers together, once again be sure to align all four sides of the papers evenly for correct placement.
Here's a look at the finished piece...

And one more look at the Brag Card once additional diecuts have been added and it's in place on the altered frame.

I'd love to know if you give this technique a try! Leave me a comment and let me know.
--------------------
Please visit our Design Team Gallery to view more of Jaclyn’s beautiful work.
Here's the January Main Kit:

For full descriptions of our kits, subscription information, and more, visit our website at MyCreativeScrapbook.com
2 comments:
Such a cute idea!
Very nice. I wondered about the back attaching but the foam tape solves it perfectly. Thanks for sharing your talent!
Post a Comment