
My Creative Scrapbook design team member Helen Tilbury is up today with a tutorial featuring our November Mixed Media Kit!
(The November Mixed Media Kit is still available for purchase, but only in limited quantities... hurry!)
(The November Mixed Media Kit is still available for purchase, but only in limited quantities... hurry!)
Here's Helen:
>>><<<


>>><<<
Hello there My Creative Scrapbook fans! Helen here today with
18 Handy Tips for creating a MIXED MEDIA MINI ALBUM
- I hope you enjoy them & learn something new today...

1. So how do you go about creating a mini album? The prospect is always a little daunting at first, but breaking it down into achievable steps makes it easy & fun, especially with a kit all selected for you like this one from My Creative Scrapbook!

2. Although I am showing you the cover first - for the sake of continuity - you need to do the cover last. Save your bulky embellishments for it and set them aside.
You'll find it much easier to work on your album whilst the cover is still flat & leaving it until last will also ensure that it doesn't get squashed, stained or damaged during the construction process.

3. There is usually always ribbon or braid supplied with a kit, like this gorgeous striped cotton ribbon as well as cream lace & black lace too.
Set aside your ribbons & braids for your album spine. Big bows always look fab!! If you have a long enough length to create a double bow learn how to do that HERE.

4. Don't forget about your back cover.
Whilst there is obviously no reason for it to be elaborate you need to keep it in theme with the front cover & contents so need to reserve enough medium to enable that.

5. Before you begin glue two pages together at a time, in order to create thicker pages. Unless of course your album is especially designed for watercolours, with a gsm of 180gsm or more. This is only necessary if you plan on using various mediums on your pages {such as sprays, paints, inks, etc}.
This will lessen the warp of your pages, which tend to buckle if dampened. This helps minimise this as much as possible.

6. Cut up the papers you are using (or those supplied in the kit) according to the design possibilities. For example - cut up journaling cards, printed strips, fussy-cut elements,etc.

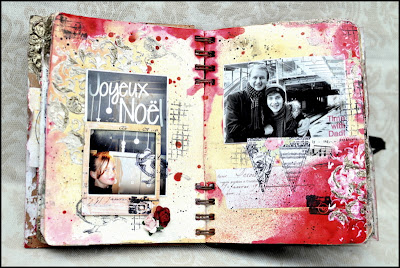
7. Now split your cut paper elements up into the same amount of piles as you have pages (for example 19 double-spreads equal 19 piles), to ensure an even distribution throughout your album.
{This album will give you 19 double page spreads
although not all are shown here}.


8. Do the same with your embellishments.
Split them up into the same amount of piles as you have for the papers. For the same reason as above (no. 3).

9. Decide upon a theme for the album and print out the correct amount of photos in advance. Resize them according to the size of your album. I had my photos printed 2 per jumbo (10 x 15cm print) as my album was just 14 x 19cms.

10. Choose a stencil (in this case supplied with the kit) as well as a few stamps, and use these on every page, to provide continuity to your album and make it look cohesive.

11. Stamp using archival ink as it is permanent and waterproof so won't smudge or run, even if you add other mediums on top of it.

12. Don't add a lot of bulky embellishments to your pages or your album won't close nicely - rather reserve these for your cover.

13. If you can't resist using flowers on your pages (like me) open up the petals as much as possible and use your heavy scissor blades to push the flowers as flat as possible (be careful as often they have a central wire holding them together, which can pierce your finger!)

14. Dry off each double-page spread thoroughly, either overnight or by using your heat (embossing) gun, before starting on the next, to avoid them sticking together when you turn over your page.

15. As an additional precaution, use pieces of greaseproof paper - cut roughly to size - to place between each page of your album until it is completely dry - to stop tacky paint, etc sticking to the opposite page.

16. Have fun! Enjoy yourself experimenting!! Mini-albums & art journals are meant to be a fun place to try out new techniques so don't stress too much about whether or not everything is perfect!

17. Think of your mini album as one complete unit - meaning that not every page needs to be a work of art of full of detail because people will be looking at all of it as a whole, like they would just one layout.

18. Don't forget to use your ephemera on your pages. I used postcards, tickets & pages from pamphlets. With this album there is an envelope at the front to store even more, as well as a pocket at the back.
I hope you will have learned at least one new idea today, that will come in handy when you are putting together your next {or first!} mixed media mini album.
>>><<<
We invite you to join us and experience the possibilities that our coordinated monthly kits offer. To purchase a kit, please visit our website, here.
4 comments:
Awesome job on this Helen!
Thanks Kris!!
What a fabulous album and your tips and tricks are worth reading again and again!!!
Excellent work using the Mixed Media kit.. Love what you created Helen
Post a Comment