To view or purchase our kits, click here.
For our sketch challenge (deadline: June 14), click here.
For our huge Prima prize giveaway, click here.
For our huge Prima prize giveaway, click here.
------------------------------
My Creative Scrapbook Design Team member Carla Marchee has prepared some wonderful tutorials for you with our kits this month. We'll share one now and one a bit later in the day, so be sure to check back!Read on to see how she created her burned edges on one of her May Main kit layouts.
Here's Carla:
"Burning paper edges is so easy!!
Here is what I have done with this design.
Step 1 First I cut out the middle of the designer paper so that I can use it again for another project.
Step 2 Then I used scissors to cut a wavy edge for a ruffle effect (save the excess paper for later use).
Step 3 This is what you need:
Step 4 Before you begin have a glass of water or a wet towel close by, just in case. I held the edges of the paper in the flame just until it caught on fire.
Step 5 Then I pulled it out of the flame with a wet cloth or wiped it quickly to stop the burning.
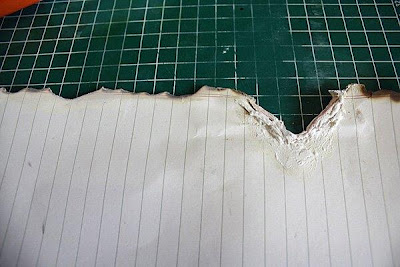
Step 6 This is what it looks like:
Step 7 Then I brushed the edges with gesso so that it looks really cool.
Here you see my close ups:"
Carla Marchee
My Creative Scrapbook Design Team member
------------------------------
and here's more of Carla's beautiful work using the kit:
(Please visit our Design Team gallery to view the beautiful tags that Carla filled her altered box with!)
Be sure to check back again a bit later in the day for another tutorial from Carla!
You can see more of her work on her blog, here.
My Creative Scrapbook kit club is all about you and helping you preserve your memories in a fun and creative way. For information about subscribing to any of our monthly kits, please visit our website, here.
You can see more of her work on her blog, here.
My Creative Scrapbook kit club is all about you and helping you preserve your memories in a fun and creative way. For information about subscribing to any of our monthly kits, please visit our website, here.


2 comments:
fear of god t shirt
jordan shoes
off white
supreme t shirt
spongebob kyrie 5
pg shoes
nike kyrie 7
golden goose
golden goose
kyrie shoes
doonhglt492
golden goose outlet
golden goose outlet
golden goose outlet
golden goose outlet
golden goose outlet
golden goose outlet
golden goose outlet
golden goose outlet
supreme outlet
golden goose outlet
Post a Comment