
Here's Nicole...
What an honor it is for me to be a guest designer again for My Creative Scrapbook. I had so much fun playing with the Limited Edition kit. It is so elegant and beautiful! I wanted to create something just as elegant and beautiful and i thought a gift bag and card set would be perfect.

Here are some instructions so that you can create your own:
First, you will need a few extra elements that are not included in the Limited Edition kit, namely a large paper gift bag and a smaller regular paper bag, about 3.5" wide and cut 4.25" long at the opening. You can also use one of your favorite border punches to create a fancy border on both the bag and the card.

Use your border punch and punch out 2 border strips out of regular cardstock the same width of your paper bag. Glue the borders on a piece of patterned paper about 3.5" high. Stick to the bag.

Cut out a circle about 4.5" in diameter out of your patterned paper making sure to include some of the flower designs. Then, fussy cut some more flowers out of the paper that you will be using on both your bag and card.

Now you need to distress the chipboard circle. Cover it with white gesso and heat it up to make it bubble and add some texture. You can then add a coat of white or off-white paint and then, while the paint is still wet, dust it lightly with yellow or gold glitter. Once dry, you can dab it with some yellow-tone distress ink or chalk.


Stick the paper circle on your paperbag and then line it with the chipboard circle. Add some lace ribbon along the edge of the patterned paper strip.

Add some of the flowers that you fussy-cut out of the patterned paper and add one of the flowers from your kit. And your gift bag is now finished

Now on to the card:

Note that i finally decided not to use the resin frame included in the picture on this project. I am saving it for a layout that i will be sharing with you later on this month on the My Creative Sketches blog.
Cut a card base about 5.5" square out of cardstock.
Take the small paper bag and distress the opening a little. Cut out the 'Loved' card out of the Webster's Pages paper. Insert the card inside the paper bag just enough so that you can still see the word 'Loved'. Glue the bag to your card base.

Punch out another border out of your cardstock about 3.75" wide. Glue the border on a piece of patterned paper about the same width. Add a strip of ribbon. Stick on your card on top of the paper bag.

Add all the rest of the flowers you fussy-cut out of your patterned papers. Add as many as you'd like on your card, spacing them in a nice flower arrangement design. Add a smaller flower from your kit.

You can now recreate this project with any paper collection you want to use, in different themes and colors. I am sure that a special person in your life would truly appreciate such a pretty handmade gift from you!

Here are some instructions so that you can create your own:
First, you will need a few extra elements that are not included in the Limited Edition kit, namely a large paper gift bag and a smaller regular paper bag, about 3.5" wide and cut 4.25" long at the opening. You can also use one of your favorite border punches to create a fancy border on both the bag and the card.

Use your border punch and punch out 2 border strips out of regular cardstock the same width of your paper bag. Glue the borders on a piece of patterned paper about 3.5" high. Stick to the bag.

Cut out a circle about 4.5" in diameter out of your patterned paper making sure to include some of the flower designs. Then, fussy cut some more flowers out of the paper that you will be using on both your bag and card.

Now you need to distress the chipboard circle. Cover it with white gesso and heat it up to make it bubble and add some texture. You can then add a coat of white or off-white paint and then, while the paint is still wet, dust it lightly with yellow or gold glitter. Once dry, you can dab it with some yellow-tone distress ink or chalk.


Stick the paper circle on your paperbag and then line it with the chipboard circle. Add some lace ribbon along the edge of the patterned paper strip.

Add some of the flowers that you fussy-cut out of the patterned paper and add one of the flowers from your kit. And your gift bag is now finished

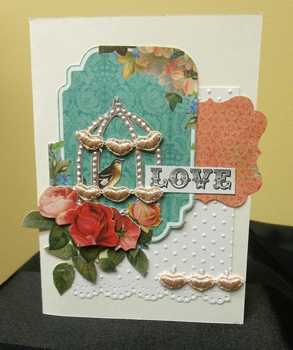
Now on to the card:

Note that i finally decided not to use the resin frame included in the picture on this project. I am saving it for a layout that i will be sharing with you later on this month on the My Creative Sketches blog.
Cut a card base about 5.5" square out of cardstock.
Take the small paper bag and distress the opening a little. Cut out the 'Loved' card out of the Webster's Pages paper. Insert the card inside the paper bag just enough so that you can still see the word 'Loved'. Glue the bag to your card base.

Punch out another border out of your cardstock about 3.75" wide. Glue the border on a piece of patterned paper about the same width. Add a strip of ribbon. Stick on your card on top of the paper bag.

Add all the rest of the flowers you fussy-cut out of your patterned papers. Add as many as you'd like on your card, spacing them in a nice flower arrangement design. Add a smaller flower from your kit.

You can now recreate this project with any paper collection you want to use, in different themes and colors. I am sure that a special person in your life would truly appreciate such a pretty handmade gift from you!
------------------------------

My Creative Scrapbook Guest Designer


------------------------------
Check out more of Nicole's work featuring our March LE kit:
Check out more of Nicole's work featuring our March LE kit:


Please visit our Design Team Gallery for more layouts, cards, and projects from our designers!
We invite you to join us and experience all of the fun and excitement that we have coming for 2013. Click here to find the My Creative Scrapbook kits.
No comments:
Post a Comment