
Hello everyone!!
Today, I have an easy technique tutorial to share with you all today using the My Creative Scrapbook January 2017 Limited Edition Kit.
I'm going to show you all how to white wash your projects. It happens to be one of my favorite go to techniques and you will see this in just about every single one of my projects, whether it's a layout, card, tag or some other type of project! White washing tends to give your projects a toned down, soft, cohesive look, and can definitely give some added texture!
Lets get started!!
You will need:
white gesso of your preference (I prefer heavy gesso)
paint brush
something to squeeze your gesso onto if your not accustomed to squeezing it directly onto your paint brush (I just used some flower packaging)

**note: something I forgot to add in my photo of supplies needed is the larger brush I use, which is actually not a paint brush at all but a cheap make up brush. the tip is so thick and soft and I have found this to work best on large areas as well as when covering a large background space, such as a layout.
STEP 1:
Once your project is complete and the glue is dried you can apply a white wash to it. You begin by squeezing a small amount of gesso onto something disposable or washable such as a paint tray. If this is your first time working with gesso you might want to start with a smaller amount on your brush until you are comfortable with applying it to your project and have a feel for the amount you need for the look you are wanting to achieve. There is no set rule to how much or how little you can apply to your project, it's all about how dark the items you are covering are as well as how toned down you want the project to look. To apply it to your project you just start lightly applying and randomly spreading the gesso over the things you'd like covered, You can apply gesso to just about anything on your project, it is not limited to paper and flowers, I have even applied it to ribbon and trim to tone them down and blend them in. I personally like to start from the inside out, but however you work is up to you. Keep in mind while doing this that the coverage does not have to be full but instead random....this gives it a textured, distressed look and feel.
T
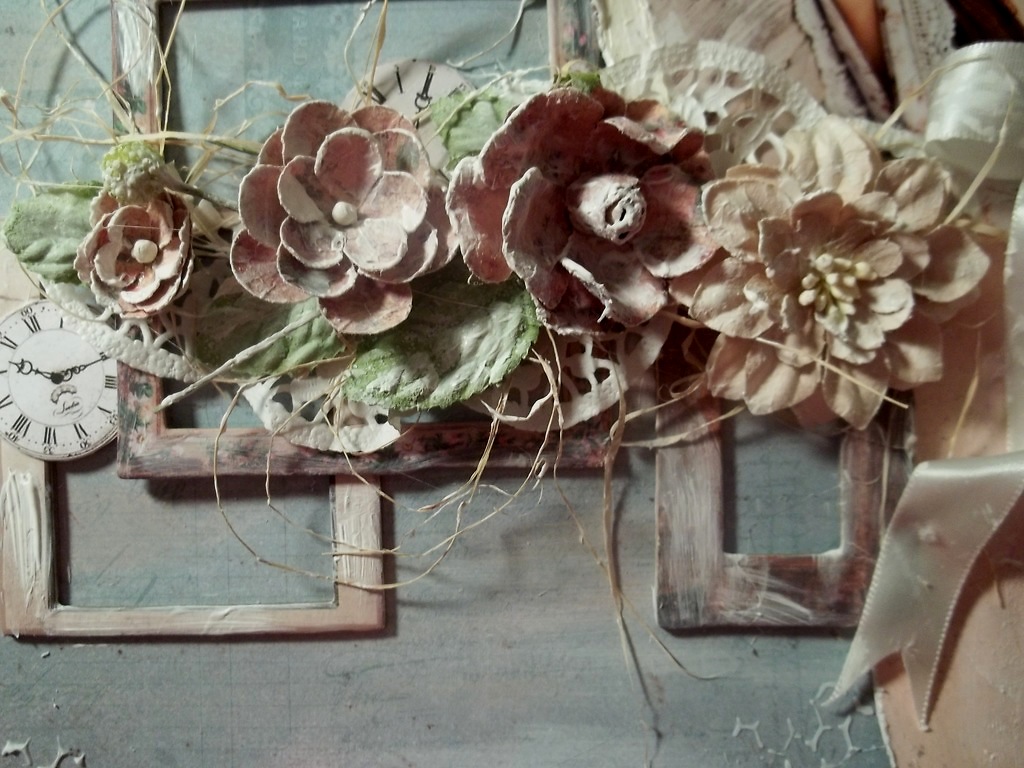
This is my flower cluster and chipboard frames prior to white washing

Beginning to apply the gesso to the flowers

Gesso completely applied to leaves and flowers

Applying gesso to chipboard frame

Applying gesso to some rafita ribbon I applied beneath the flowers

finished applying gesso, my project now is now white washed!!
The nice thing about gesso is you really can't mess your project up, as it blends in so nicey if you just smooth out anything you don[t like with your paint brush or finger. The biggest tip I have to offer is don't be scared of mixed media supplies, they are really less daunting than they might seem. The best way to get started is just to give them a try, try different techniques on a scrap paper and supplies and see what does and does not work for you, you might be surprised!
Like I said, this white washing is a super easy technique, anyone can do it and with so little effort it can really transform your projects!
Thanks for stopping by, I hope this was helpful and you are inspired to create your own masterpiece!
3 comments:
Thank you Jenifer - I have recenly started to do this to some of my projects and agree with you - it definitely adds a vintage appeal to them. One other technique I am going to try is to gesso a whole project very white and then, once dry, to spray with 2/3 shimmery colours, or maybe i colour but varying hues ;-)
The gesso adds a wonderful touch to your project!
Gorgeous!
Post a Comment