
Happy Friday! Design Team member Lee-Anne Thornton is helping us kick off a creative weekend by featuring our March Main Kit with 4 ways to create layout backgrounds with distress inks!
Here's Lee-Anne...
Hello friends! Today I wanted to share some tutorials on how I created four different backgrounds for my layouts with distress inks. The layouts were created using the March Main Kit.
For the first layout, I began with the Ranger Tattered Rose and Victorian Velvet Distress Ink Pads and used the left edge of each of the distress ink pads and pressed down and swiped in short swipes.


For the second layout, I created a horizontal striped background by simply using the Ranger Tattered Rose Distress Ink Pad swiping the ink pad flatly across the white cardstock as shown below.


Here is the layout that I created with the horizontal striped technique.

For the third technique, I began with six colors of distress inks.


I added the second color, Scattered Straw using the same technique

Next I used the Worn Lipstick

Then the Tumbled Glass Ink Pad

Followed by the Tattered Rose Ink Pad

Finally I added the Tumbled Glass Ink Pad


Here is my layout with this technique.

I hope you have enjoyed these tutorials and remember that practice makes perfect. It makes the kit stretch a little further too. Have a creative day!
Here's Lee-Anne...
Hello friends! Today I wanted to share some tutorials on how I created four different backgrounds for my layouts with distress inks. The layouts were created using the March Main Kit.
For the first layout, I began with the Ranger Tattered Rose and Victorian Velvet Distress Ink Pads and used the left edge of each of the distress ink pads and pressed down and swiped in short swipes.
Here is the completed layout for this technique:

Here is the layout that I created with the horizontal striped technique.

For the third technique, I began with six colors of distress inks.
 |
| Ranger Tattered Rose, Victorian Velvet, Tumbled Glass, Scattered Straw, Worn Lipstick and Peeled Paint |
I began with the Peeled Paint Ink Pad and began at the top edge and dabbed the ink pad with the top edge of the ink pad across the 12X12 white cardstock, as shown, until it was randomly stamped across the entire page.

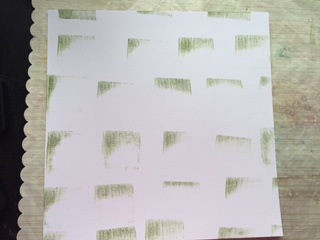

Next I used the Worn Lipstick

Then the Tumbled Glass Ink Pad

Followed by the Tattered Rose Ink Pad

Finally I added the Tumbled Glass Ink Pad

Here is the completed layout:

The fourth technique with distress inks is a faux woodgrain background. I love this technique. I began with a scoring board and a 12X12 sheet of white cardstock and Ranger Tattered Rose Distress Ink. If you do not have a scoring board, a ruler and a bone folder will also work. Begin by placing the white cardstock in the scoring board and scoring lines every two inches or whatever width is desired. I chose a width of two inches for my layout.
 |
I swiped along the scored lines from left to right placing the entire surface of the ink pad flatly along the surface.
My ink pad is not saturated with ink and is fairly dry, but I didn't want the color too saturated.
Here is my layout with this technique.

I hope you have enjoyed these tutorials and remember that practice makes perfect. It makes the kit stretch a little further too. Have a creative day!
Here are our March Kits (click to enlarge):

For full descriptions of our kits, subscription information, and more, visit our website at MyCreativeScrapbook.com
4 comments:
Excellent tutorial
Thank-you! Got to try these out.
hermes outlet
a bathing ape
chrome hearts outlet
off white outlet
ggdb
doonhglt492
golden goose outlet
golden goose outlet
golden goose outlet
golden goose outlet
golden goose outlet
golden goose outlet
golden goose outlet
golden goose outlet
supreme outlet
golden goose outlet
Post a Comment