
Guest Designer Jaclyn Rench is up today to share some fun ways to alter wood veneer embellishments!
Here's Jaclyn...
Here's Jaclyn...
The February Main kit includes a cute package of wood veneers from Crate Paper. This was one of my favorite embellishments in the kit and one that I knew I could customize to fit my pages. Wood veneers are easy to alter, and doing so requires little in the way of added supplies.
Did you know that you can stamp and/or emboss on wood veneer? The wood surface is a great base for holding ink. Here's a fun and easy way to add colorful embossing.
Gather your supplies: your selected wood veneer piece, a sticky ink such as Versamark, your chosen embossing powder and a heat embossing gun.

I chose to emboss only the bottom half of my wood veneer tag, but you could certainly emboss the entire surface. In doing so, I needed to mask off the portion of the tag that I wanted to remain plain. I used a strip of washi tape to create a diagonal line through my tag and also to temporarily adhere my embellishment to my work surface.

The next step is to apply the ink. I flipped my ink pad upside down and pressed it along the entire surface below my washi tape barrier. Be sure to saturate the entire surface, but not go above the washi tape barrier you have created for yourself.


Next it's time to shake off the excess embossing powder and gently peel away the washi tape mask. Be careful not to touch the embossed area, as to not disturb the powder. If you do happen to get your fingers in the powder or there are any areas that got missed, you can sprinkle on additional powder to ensure their coverage.

Using a heat embossing tool, apply heat to the wood veneer until the powder is melted. It's as simple as that and the results are so fun!

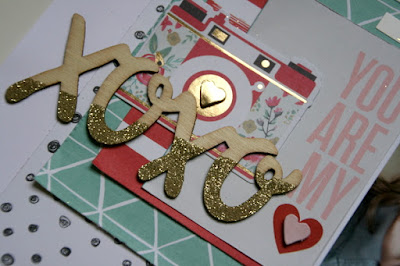
Here is a snippet from a page that I created with the Main kit using this technique. The only difference it that I used a gold glitter embossing powder in place of the teal. I love the bit of glitter and interest it adds to the XOXO page title.

To alter this piece, I chose to separate the double heart design, leaving just the open heart in tact. I used my exacto knife to lightly trace a line into my wood veneer as shown. Be sure to use light pressure with the exacto, so you don't split the wood in any unwanted places. You can continue to go over the lines you've made making the cut deeper and deeper, but again, doing so gently.

This line will act as a 'breaking point'. At this point you should be able to gently bend the piece and break off the unwanted portions of the design, or further cut the design with your scissors. You'll be left with a raw and ragged edge and this is where the file/sandpaper comes in. File the raw edges until they are clean and smooth.


Did you know that you can stamp and/or emboss on wood veneer? The wood surface is a great base for holding ink. Here's a fun and easy way to add colorful embossing.
Gather your supplies: your selected wood veneer piece, a sticky ink such as Versamark, your chosen embossing powder and a heat embossing gun.

I chose to emboss only the bottom half of my wood veneer tag, but you could certainly emboss the entire surface. In doing so, I needed to mask off the portion of the tag that I wanted to remain plain. I used a strip of washi tape to create a diagonal line through my tag and also to temporarily adhere my embellishment to my work surface.

The next step is to apply the ink. I flipped my ink pad upside down and pressed it along the entire surface below my washi tape barrier. Be sure to saturate the entire surface, but not go above the washi tape barrier you have created for yourself.

Now you can pour on the embossing powder. I chose a bright teal blue powder that would contrast nicely yet still compliment the wood tones in the veneer.

Next it's time to shake off the excess embossing powder and gently peel away the washi tape mask. Be careful not to touch the embossed area, as to not disturb the powder. If you do happen to get your fingers in the powder or there are any areas that got missed, you can sprinkle on additional powder to ensure their coverage.

Using a heat embossing tool, apply heat to the wood veneer until the powder is melted. It's as simple as that and the results are so fun!

Here is a snippet from a page that I created with the Main kit using this technique. The only difference it that I used a gold glitter embossing powder in place of the teal. I love the bit of glitter and interest it adds to the XOXO page title.

Another way to alter your wood veneer pieces is by cutting them apart. It may sound a bit scary but it's easy as can be and requires even less tools than the last example.
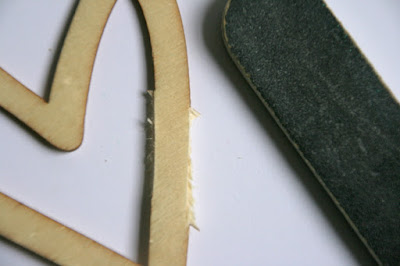
For this technique you'll need your selected wood veneer piece, an exacto knife, a pair of scissors and a file or sandpaper.

To alter this piece, I chose to separate the double heart design, leaving just the open heart in tact. I used my exacto knife to lightly trace a line into my wood veneer as shown. Be sure to use light pressure with the exacto, so you don't split the wood in any unwanted places. You can continue to go over the lines you've made making the cut deeper and deeper, but again, doing so gently.

This line will act as a 'breaking point'. At this point you should be able to gently bend the piece and break off the unwanted portions of the design, or further cut the design with your scissors. You'll be left with a raw and ragged edge and this is where the file/sandpaper comes in. File the raw edges until they are clean and smooth.

Here's a close up of a page I put together with the February main kit, where I customized the title with this technique. The original piece had a script word 'hello' attached above 'love'. Once trimmed and filed the title letters look as if they came out of that package that way!

So, now you know two fun and easy ways to alter and customize your wood veneer embellishments. I hope you'll give these techniques a try!

Please visit our Design Team Gallery to view more of Jaclyn’s beautiful work.
Here are our February Kits (click to enlarge):

For full descriptions of our kits, subscription information, and more, visit our website at MyCreativeScrapbook.com


No comments:
Post a Comment