My Creative Scrapbook design team member
Angel Rodrigue is back again today with a step by step off the page project tutorial featuring our October
Main kit!
Here's Angel...
This Month Pam asked me to do a Off the Page Project with the main kit and 3 paper mache Boxes.Of Course I said Yes as I love to altered especially if it has to do with My Creative Scrapbook Kits!Love there Kits.. Below I will show you step By Step in How I created My Project.
Step One- First I wanted to paint each box so I used some satin acrylic craft paint from Martha Stewart color Summer Linen.I used Two Coats!
Step 2- After the paint dried I chose the pattern paper from the main kit that I thought matched the best and cut them to size and added them to each side of the box, cover and also the inside of the box and cover. I wanted it to be well protected so I used Modge Podge to do this.
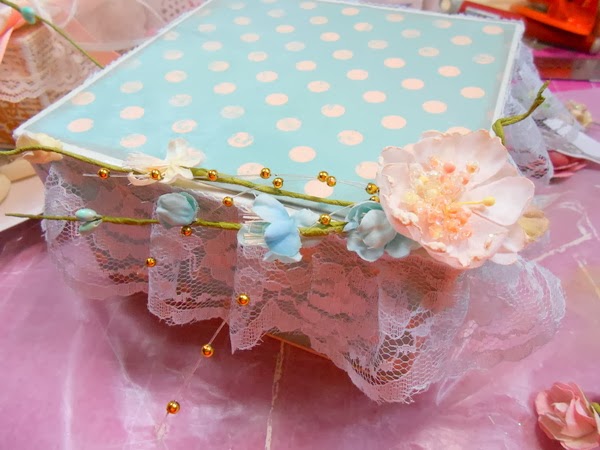
Step 3- After the Modge Podge dried I started adding lace to the cover of each lid using Helmar 450 Liquid Glue.(Again I wanted to be sure I used a Strong Adhesive so It can withstand the pulling of the covers)
Now this is where you should be...
Step 4- Now we are ready to add the beautiful Flowers that Pam always fills her kits with... Just a Note before you start Be sure you don't glue to shut your lid. You want to be able to open the lid of each box. So when gluing down be sure its on the lip of the lid not the edge or the box.
Step 5- Now I added the ribbon to the side of the box along with charms ,a button and die cuts from the kit.(Note I modge podged the die cuts as well to hold up the handling)
Step 7-Now I added the gold bead sprays and some tiny flowers where I felt needed it..
Step 8- I felt that it needed feet. So I dug in my stash and found some wooden doll head that was flat on one side and round on the other. I used the same paint as above for the boxes and painted two coats on each feet. Then I applied some E600 Glue so it can have a strong hold to each feet and adhered the feet flat side each of the 4 corners of the bottom of the last Box.
Step 9- I wanted something to bring interest to the very top of the box. So I used a sticker from the collection in the main kit and matted it on card stock bigger that I needed at the bottom so that I was able to score a half inch to make a hinge so my sign can stand up. Then I added a half of a small doily at the top along with a die cute from the collection and the stickers for my title. I also added a threaded button to the center of my clock for a little extra cuteness.

Step 10- I wanted the boxes to be one unit. I took the middle box and added some helmer 450 glue under the bottom of the box and adhered it to the bottom box cover and I also did the same to the top box and adhered it to the middle box cover.I had lots of extra so I made a Mini album using the idea from Stephanie Miller.It was the perfect Size From the Box. I also made some altered clothes pins as well to add in the top box along with some extra charms flowers and Ribbons. I saved the middle box to use as a storage for photos.
Here is pictures of the inside covers as well as the extras I added in the boxes...
Here is a example of how the lid comes off each box..
Close up of the Altered Pins...
Extra Closeups....
--------------------------------------------------------------
We
invite you to join us and experience the possibilities that our
coordinated monthly kits offer. To purchase a kit, please visit our
website, here.


.JPG)


3 comments:
Angel this is sooooo beautiful!!
WOW!!!! such a stunning project!!! this is amazing
This is one heck of a project Angel! Kudos to you!!
Post a Comment